We use
cookies and similar technologies
to help give you the best experience on our site and to show you relevant advertising. If you continue to use this site, we’ll assume that you’re happy to receive all cookies


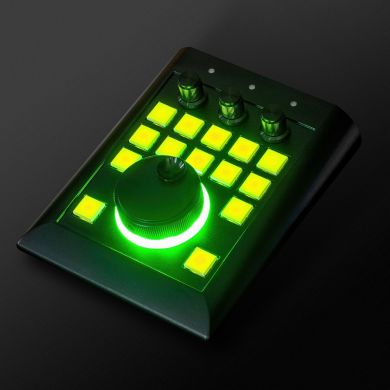
E-Coder2 SE Control Panel
SKU Part Number:
ECODER2-SE
E-Coder2 SE is the control panel of the new generation with an HQ built-in stereo 24 bitaudio codec with 114 dB dynamic range (CS4272).When you...
Read More
Read More
£549.95
£458.29
Availability: In stock

Seen this product cheaper elsewhere?
Call 0345 2300 599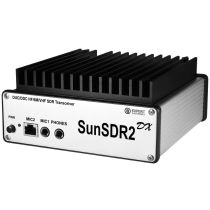

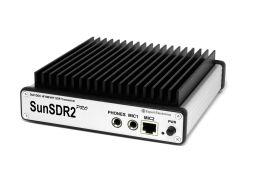
Expert Electronics SunSDR2-DX - HF/6M/VHF Transceiver
Special Price
£1,999.00
£1,665.83
Regular Price
£2,299.99
(Inc VAT 20%)
E-Coder2 SE is the control panel of the new generation with an HQ built-in stereo 24 bitaudio codec with 114 dB dynamic range (CS4272).
When you operate in RX mode, the ExpertSDR2/3 sends the same audio stream in the TRX and in the E-Coder2 SE. Thus, you can listen to the air directly from the TRX or from the E-Coder2 SE, the latency in both cases is the same - almost nonexistent. Also, in E-Coder2SE, we've implemented a special CW core to minimize latency if you monitor yourself during transmission. Now you can operate your TRX remotely, not bothering about possible monitoring delays, this is a new reality!
E-Coder2SE will be especially useful for those who use the Expert Remote System (ERS) and who place their transceiver at any distance from the operating position.
USB-port should provide 5V, current not less than 0,5А.
The main difference between E-Coder2 and E-Coder2 SE:
1. 3 mm aluminum case makes the SE (steel edition) panel as sturdy as an armored plate and really nice to the touch.
2. It weighs 574 gr vs 352 gr for standard version, additional grams enhance the panel’s grip on your table.
3. New coating of the main encoder and new bottom bezel with scale marks, improve overall user experience.
4. Three black anodized encoders, on top, add polish notes to the look of the panel.
On the rear panel of the E-Coder2 SE, you'll find four stereo Jack 6.3 connectors: headphones, microphone (designed for asymmetrical mics), CW-paddle, PTT foot switch.
Microphone connector pin-out![]()
![]()
CW-paddle, PTT footswitch![]()
PTT Footswitch should be connected to the PTT socket, it controls the transceiver's TX mode.
When you press the footswitch, PTT Line connects to the Ground (Case), it turns the transceiver to TX. A red LED TX indicator on the panel will flash while you TX.
Straight Key should be connected to the KEY socket with disconnected ring contact. Pressing the key turns the transceiver to the TX mode and it generates a continuous CW signal (manual mode). Releasing the straight key returns the transceiver to the RX mode.
Twin-paddle Key (single-paddle) should be connected to the KEY socket. Pressing one of the key's paddles (or one side - for single-paddle) will turn the transceiver to the TX mode and begin automatic generation of dots and dashes. Releasing the paddle returns the transceiver to the RX mode.
In the Panel menu, you can see the settings of the E-Coder control panel. In the drop-down Device menu, you can select the type of the connected control panel.
Note! If one E-Coder panel is connected to the transceiver, in the Panel menu displayed one E-Coder 1 tab, if several E-Coder panels are connected to the transceiver, in the Panel menu displayed several tabs E-Coder 1, E-Coder 2, etc. with identical settings for each panel.
![]()
E-Coder2 settings in the ExpertSDR3 0.11.0
In the left part of the menu, you can see the schematic picture of the E-Coder panel with buttons and knobs.
Press any button, you'll see the list of the available functions.
In the right part of the menu, you can see the main panel settings:
- Enable - enable E-Coder panel control
- Use IF - frequency tuning by moving the filter over the panorama
- Use IF as RIT - tuning by IF when the RIT offset is on
- Use IF as XIT - tuning by IF when the XIT offset is on
- VFO B - enable sub-receiver
- Adaptive tune - te faster you rotate the main knob the bigger the tuning step
- Fine tune - enable for a more precise tuning
- Key Led - enable backlit keypad
- Encoder Led - enable the backlit encoder
- Transceiver 1 - select one of the software receivers RX1 or RX2
- No transfer PTT - drop-down menu.
- Sound card tab
Indication of mic and headphones signals. - Monitor - uses the DSP core in the panel, this way audio is generated by the panel itself which eliminates monitoring delay, but the sound you hear will differ from what you actually TX on the air.
- Monitor in TX - uses the ExpertSDR3 DSP, this way you hear exactly what you TX, but with a delay.
There are three LEDs on the E-Coder panel, from left to right:
1) Lights green when the VFO B is active
2) Lights red when on TX
3) Lights orange when the RX2 is active
For proper operation of the E-Coder2 SE panel USB-port should provide 5V, current not less than 0,5А. Otherwise, you might have issues with the audio—cracks, improper supply of the mic.
Shipping:
We have several shipping options for our products, including next-day and Saturday/Sunday delivery for certain items. Please see these options at checkout.
Returns:
If you have any equipment that needs to be returned to Martin Lynch & Sons, please fill out the form below:
Upon receipt of goods you have 14 days to return goods however the goods must be returned in original packaging and care must have been taken with the goods you wish to return. Under distance selling regulations you are not entitled to any refund on carriage charges or modification charges made at your request.
Warranty Terms and Conditions
Outside of the 14 faulty return period, returned items cannot be accepted, unless covered by manufacturer's warranty. We will repair as much as possible on site however in exceptional circumstances products may have to be returned to the manufacturer of distributor.
For repairs/replacements under manufacturer’s warranty for any item please download a ML&S return form from the link above and return to ML&S with the faulty product.
International Warranty information
Warranty service for items we sell is available in the U.K. only, unless otherwise noted. It is your responsibility to pay freight for returned items to the U.K. and back to you for desired warranty coverage. All of our NEW products come with a minimum 12 month warranty, (Yaesu & Icom 24 months), with up to 90 days on second-hand equipment. Items returned for service must state "returned goods for repair" on the return air waybill or U.K. import customs duties apply and will be added to your invoice. For more info about returning items please contact our customer help desk, [email protected]