

Read More

Seen this product cheaper elsewhere?
Call 0345 2300 599
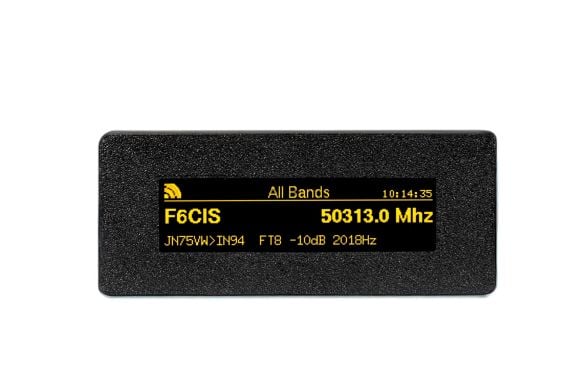
The TopBytes DXSpotter is a compact, WiFi enabled DX cluster display that brings real time spot information straight into your shack – without needing a PC, laptop or tablet running all day. Just add USB power and WiFi, and you have a dedicated DX “radar screen” for your favourite bands.
What is DXSpotter?
DXSpotter connects to your chosen DX cluster over the internet and shows live spots on its bright 256×64 yellow OLED display. Frequency, callsign and comment are clearly presented with smooth scrolling, a band title, WiFi signal icon and real time clock, so you can see band activity at a glance from across the room.
Key features
- Dedicated DX cluster display for amateur radio stations
- Built in WiFi - connects to your home or portable network
- Works with standard Telnet based DX clusters (DXSpider, CC Cluster, etc.)
- Pre configured to use the UK hamserve DX cluster by default
- High contrast 256×64 yellow OLED screen with smooth scrolling
- Shows callsign, frequency in MHz and spot comments
- Status line with WiFi signal strength, custom display title and clock
- Web based configuration portal - no special software required
- Band and frequency filtering so you only see the spots you care about
- Adjustable scroll interval and spot history (1–15 recent spots)
- Stores settings in non volatile memory so it remembers everything after power off
- OTA (Over The Air) firmware updates via secure HTTPS
- USB powered - ideal for the shack, field days and portable operation
Typical uses
- Shack monitor - keep DXSpotter on the desk to watch band openings without tying up a PC screen.
- Contest support - track activity on your chosen band and spot new multipliers quickly.
- Portable and field days - run it from a USB power bank and campsite WiFi or a portable router.
- Learning tool - great for newer licensees to see when different HF bands are open and which modes are active.
Simple setup
- Power the DXSpotter from any 5 V USB supply or power bank.
- Connect to its built in WiFi access point and open the configuration page.
- Select your WiFi, enter the password, your callsign and preferred DX cluster.
- Optionally set band filters, scroll timing and display title.
- Save and reboot - spots will begin to appear within seconds once band activity is present.
Technical highlights
- WiFi: 2.4 GHz 802.11 b/g/n, WPA/WPA2 security
- Display: 256×64 pixel yellow OLED, wide viewing angle
- Power: 5 V DC via micro USB, typically 1–2 W
- Protocol: Telnet DX cluster over TCP, HTTP web interface, NTP time sync
- Configuration: Built in captive portal and web server
If you want a neat, low power way to keep an eye on DX and band conditions without leaving a computer on, the TopBytes DXSpotter is a superb addition to any modern shack.
TopBytes DXSpotter - User Manual
Release: 1.0.3 | Date: 21 November 2025
Website: https://DXSpotter.topbytes.net
TopBytes DXSpotter https://DXSpotter.topbytes.net Release 1.0.3 User Manual Nov 21, 2025

The DX Spotter is a compact, WiFi-enabled device that connects to DX cluster networks and
displays real-time amateur radio spot information on a high-contrast yellow OLED display.
It provides an elegant solution for monitoring band activity and DX opportunities.

We have partnered with hamserve, https://dxc.hamserve.uk as the default DX Cluster to
connect. Hamserve DX cluster is hosted in a data center with excellent bandwidth and uptime
statistics, making it a great choice for receiving your DX Spots.

-------------------------------------------------------------------------------
CHAPTER ONE – INTRODUCTION
-------------------------------------------------------------------------------

1.1 What is DX Spotter?

The DX Spotter is a dedicated amateur radio accessory that provides real-time DX cluster
spot information on a compact, easy-to-read display. Designed for ham radio operators,
it eliminates the need to have a computer or mobile device running to monitor band activity.

1.2 Key Features

1.2.1 WiFi Connectivity
• Connects to your home or portable WiFi network
• Built-in configuration portal for easy setup
• Automatic reconnection on network drops
• Support for WPA/WPA2 secured networks

1.2.2 DX Cluster Integration
• Real-time connection to DX cluster networks via Telnet
• Support for standard DX cluster protocols
• Displays frequency, callsign, and spot comments
• Automatic spot parsing and formatting

1.2.3 Display Features
• High-contrast 256x64 yellow OLED display
• Smooth scrolling animation between spots
• WiFi signal strength indicator
• Real-time clock display
• Configurable display title based on band filter

1.2.4 Band Filtering
• Configure spot filtering by band (160M through 6M)
• Display only the spots you're interested in
• Custom filter commands supported
• Automatic display title generation based on filter

1.2.5 User-Friendly Configuration
• Web-based configuration interface
• Captive portal for initial setup
• Available network scanning built into configuration page
• Save and restore settings to non-volatile memory

1.2.6 Customization Options
• Configurable scroll interval (how long each spot is displayed)
• Adjustable spot history size (1–15 spots)
• Custom display title
• Band-specific filtering
• Callsign identification

1.2.7 Over-The-Air Updates
• Firmware updates via OTA (Over-The-Air)
• No need to connect to computer for updates
• Secure HTTPS-based update mechanism
• Automatic version checking

1.2.8 Software Requirements
• A web browser (on computer, tablet, or smartphone) for initial configuration
• Access to a DX cluster server (several public clusters available)

1.2.9 Amateur Radio Requirements
• A valid amateur radio callsign
• Basic understanding of DX cluster operation
• Knowledge of the bands you wish to monitor

1.3 How It Works

The DX Spotter operates in a simple four-stage process:

1. Power On:
   When first powered, the device attempts to connect to a saved WiFi network. If no
   network is configured, it creates its own WiFi access point for configuration.

2. Configuration:
   Using the web-based configuration portal, you provide your WiFi credentials, DX cluster
   server details, and your amateur radio callsign.

3. Connection:
   Once configured, the device connects to your WiFi network and establishes a telnet
   connection to the specified DX cluster server.

4. Display:
   DX spots are received, parsed, and displayed on the OLED screen with smooth scrolling
   animations. The display continuously updates as new spots arrive.

1.4 Typical Use Cases

1.4.1 Station Monitoring
Keep the DX Spotter on your desk or operating position to monitor band activity without
dedicating a computer or mobile device screen.

1.4.2 Portable Operations
Take the DX Spotter to field day, portable operations, or camping. It only requires WiFi
connectivity and USB power (power bank compatible).

1.4.3 Contest Monitoring
During contests, filter for your favourite band and watch for rare multipliers or new
contacts.

1.4.4 DX Hunting
Set up band-specific filters to monitor for DX openings on specific bands you're interested
in working.

1.4.5 Learning Tool
New hams can use the DX Spotter to learn about band activity, propagation, and when
different bands are "open" for DX.

1.5 Design Philosophy

The DX Spotter was designed with the following principles in mind:

1.5.1 Simplicity
Configuration should be straightforward and not require technical expertise beyond
basic WiFi setup.

1.5.2 Reliability
The device should automatically recover from network disconnections and reconnect to the
DX cluster without user intervention.

1.5.3 Readability
The display should be easy to read from a distance, with clear contrast and appropriate
font sizes.

1.5.4 Efficiency
Power consumption should be minimal, making the device suitable for portable operations
with battery power sources.

1.5.5 Openness
The device supports standard DX cluster protocols and can work with any compatible
cluster server.

1.6 What's Next?
Now that you understand what the DX Spotter is and what it can do, proceed to the
Getting Started section to learn how to set up your device for the first time.
to view the rest of the manual Click Here
Shipping:
We have several shipping options for our products, including next-day and Saturday/Sunday delivery for certain items. Please see these options at checkout.
Returns:
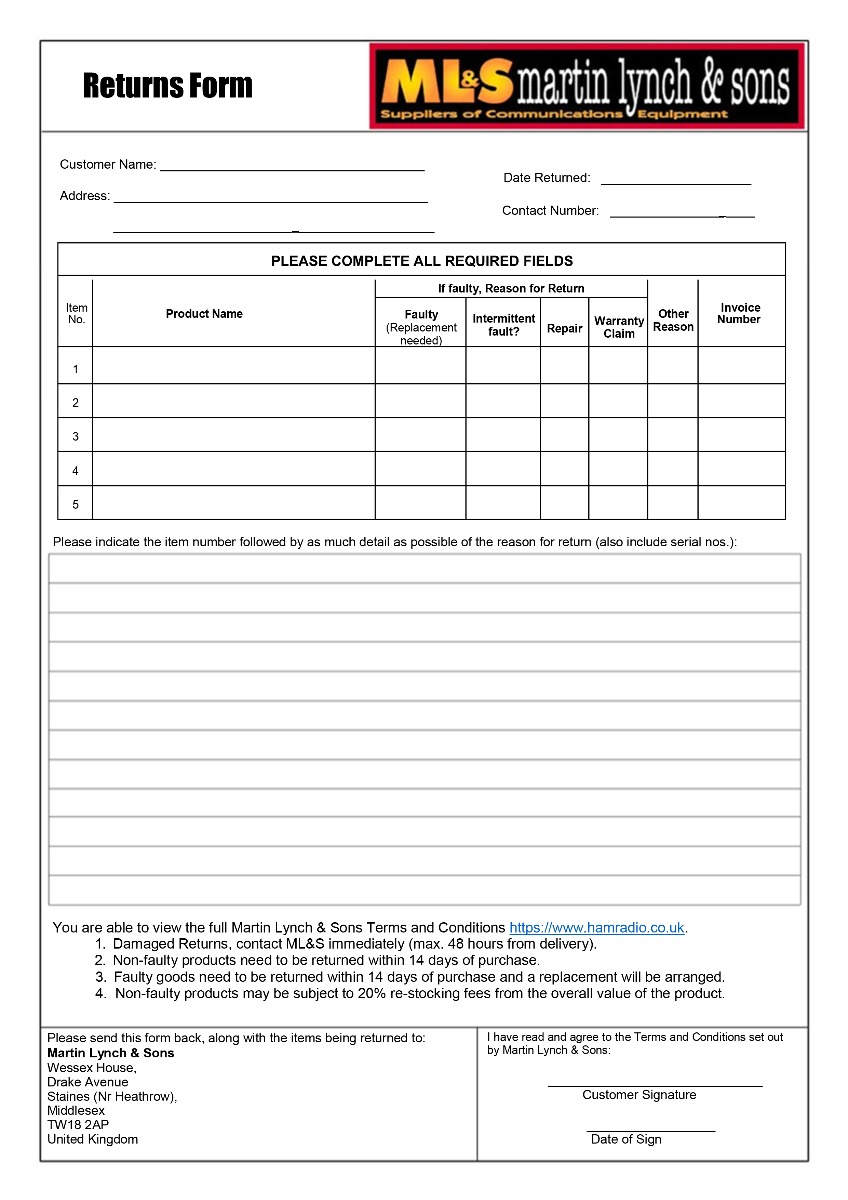
If you have any equipment that needs to be returned to Martin Lynch & Sons, please fill out the form below:
Upon receipt of goods you have 14 days to return goods however the goods must be returned in original packaging and care must have been taken with the goods you wish to return. Under distance selling regulations you are not entitled to any refund on carriage charges or modification charges made at your request. Large items cannot be returned if they have been assembled, unless faulty.
Warranty Terms and Conditions
Outside of the 14 faulty return period, returned items cannot be accepted, unless covered by manufacturer's warranty. We will repair as much as possible on site however in exceptional circumstances products may have to be returned to the manufacturer of distributor.
For repairs/replacements under manufacturer’s warranty for any item please download a ML&S return form from the link above and return to ML&S with the faulty product.
International Warranty information
Warranty service for items we sell is available in the U.K. only, unless otherwise noted. It is your responsibility to pay freight for returned items to the U.K. and back to you for desired warranty coverage. All of our NEW products come with a minimum 12 month warranty, (Yaesu & Icom 24 months), with up to 90 days on second-hand equipment. Items returned for service must state "returned goods for repair" on the return air waybill or U.K. import customs duties apply and will be added to your invoice. For more info about returning items please contact our customer help desk, [email protected]